

How to resolve RDP service exposure from the Internet?
Implementation of an RDP Gateway
Protection of the RDP Service
The RDP (Remote Desktop Protocol) protocol is a proprietary Microsoft protocol that allows connection to another computer remotely, generally via TCP port 3389 for administrative purposes.
Representing a vital entry point for a company, it is very often used by attackers to gain access to its information system and perform lateral movements.
It is sufficient, for example, for an exposed RDP service
to be affected by a public vulnerability (such as BlueKeep)
or for credentials not to be sufficiently robust
To create a flaw exploitable by an attacker.
Consequently, this service should only be exposed from the internal network of the information system and never be accessible from the Internet.
Solutions
Most observed RDP services are used for two reasons:
Remote administration
Access to documents
Regarding remote administration, it is possible to consider the following options (in descending order of preference):
Implementation of an RDP gateway, called RDG (Remote Desktop Gateway)
Deployment of a VPN (Virtual Private Network)
Hardening of the RDP service
If the second reason applies, namely for the purpose of accessing internal documents, the adoption of Microsoft O365 and its SharePoint storage space should be prioritized.
Implementation of an RDP Gateway
Description
The Remote Desktop Gateway, also called RDG (Remote Desktop Gateway), is intended to provide a secure means of connection to Windows servers within an internal network. Indeed, it acts as an intermediary between a client and a server in order to protect the exposure of any RDP service: only the gateway is exposed to clients. It uses an HTTP SSL/TLS tunnel and therefore only exposes port 443. This gateway should be located within an existing DMZ.
Gateway installation:
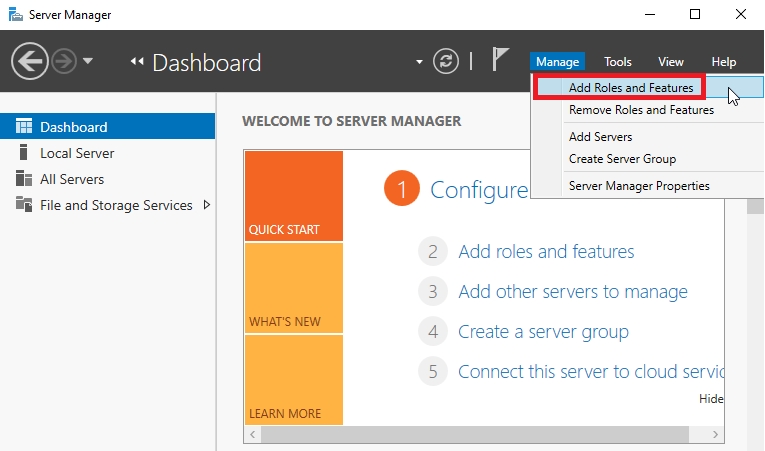
To begin installing the gateway, it is necessary to connect to the Windows server on which it will be deployed. Once connected, it is possible to open the server management application called "Server Manager".
Adding the gateway role
Once launched, it is necessary to access the "Add Roles and Features" functionality from the "Manage" tab of the Server Manager application:
Then, you can proceed with the installation by clicking the "Next" button:

The installation type "Role-based or feature-based installation" must be selected before proceeding to the next section via the "Next" button:

This step allows you to select the server on which the gateway will be installed. Once you have identified it, click on the "Next" button to continue:

This tab allows you to select the roles to add to the server. You must select "Remote Desktop Services" before clicking "Next" to continue:

Certain features can be implemented on the server from this tab. You can leave the default features selected and go further:

This is an informative tab about remote office services; it can be skipped:

From this tab, the remote desktop gateway service, namely "Remote Desktop Gateway", must be selected. The following window is displayed to the user:

From this tab, the remote desktop gateway service, namely "Remote Desktop Gateway", must be selected. The following window is displayed to the user.

Certain tabs, related to the features selected previously, have been added automatically. Click "Next" to access them:

This new tab contains information about the network policy and access service feature. Click "Next" to proceed to the next section:

This new tab contains information about the web server functionality. Click "Next" to proceed to the next section:

A list representing all services related to the web server (IIS) is displayed. It is necessary to retain this default configuration before proceeding further:

A window summarising all the services and tools that will be installed is displayed to the user. Click on the "Install" button to confirm the installation (you can authorize the server to restart automatically by ticking the "Restart the destination server automatically" box):

The installation is complete:

Gateway configuration
Once installation is complete, you must then configure the remote desktop gateway by launching its management tool from the "Server Manager" application and the "Tools" tab, as shown in the following figure:

Once the tool has been launched, the window below is displayed to the user after selecting the server name on the left-hand interface. The newly installed remote desktop gateway must be configured. To do this, you can start by importing a certificate by clicking on the "View or modify certificate properties" feature:

No certificate is installed on the gateway. There are two options:
Create a self-signed certificate
Or import a certificate corresponding to the server issued by a recognised certification authority.
The best choice is the second option. To do this, simply
Select the option "Import a certificate into the RD Gateway Certificates (Local Computer)/Personal store",
Then import it using the "Browse and Import Certificate" button:

If a self-signed certificate is to be created and used, simply select the "Create a self-signed certificate" option and click on the "Create and Import Certificate" button. The following window will appear:

The full name of the server must be entered in the first field, "Certificate name". This certificate must then be retrieved from the server and imported into all future machines using this gateway.
Once this step is complete, the window below will reappear. The imported certificate information will be updated, indicating that the import was successful.
Click "OK" to complete the gateway configuration:

Access rules must be added so that this gateway can be used correctly. To do this, click on the server drop-down menu on the left-hand side of the RD Gateway Manager application interface, then click on Policies and finally on Create New Authorization Policies, as shown in the figure below:

The following window is displayed to the user. Two access rules must be created:
An access rule for the gateway (called RD CAP) and
An access rule for internal resources from the gateway (called RD RAP).
To do this, select "Create a RDP CAP and a RD RAP (recommended)" and then click "Next":

It is necessary to choose an appropriate name for the CAP rule before proceeding via the "Next" button:

It is necessary to choose an appropriate name for the CAP rule before proceeding via the "Next" button:

This step allows you to define the redirection properties of the CAP rule. Depending on certain business needs (and for ease of use), some redirections may be important and necessary, such as copy and paste ("Clipboard"):
If certain redirections are not necessary, it is recommended to select the option "Disable device redirection for the following client device types" and then select them in order to strengthen the gateway configuration.
If all redirections are necessary, select the "Enable device redirection for all client devices" option and then click "Next".

This window is used to configure user session disconnection and expiry. It is recommended that you enable these options in order to strengthen the gateway configuration before continuing with the "Next" button:

A summary of the CAP rule configuration appears. You must now configure the RAP rule by clicking the "Next" button:

A summary of the CAP rule configuration appears. You must now configure the RAP rule by clicking the "Next" button.

In the same way as the CAP rule, only the group(s) containing legitimate users who are authorised to use the gateway to access internal resources should be selected in the "User group membership (required)" box via the "Add Group..." button.
Ideally, a specific user group should be created for this access within Active Directory to ensure their legitimacy.
You can then proceed by clicking on the "Next" button:

This window is used to specify all internal resources accessed from the gateway.
It is recommended to create a domain group containing all legitimate servers that can be accessed from this gateway and to specify it using the "Select and Active Directory Domain Services network resource group" option.

The access ports used must be specified, either the default port 3389 for the RDP service or another port or ports if necessary:

In the same way as the CAP rule, a summary of the RAP rule configuration appears. You must confirm by clicking the "Next" button:

A window pops up, confirming the CAP and RAP rules:

Launching the gateway service
Finally, the gateway service may be stopped. You can check its status and activate it if it is not already running, as shown in the following figure.
From the Remote Desktop Services tab in the Server Manager application, the "Servers" tab and the "Services" section, the gateway service is identified by its name "Remote Desktop Gateway".
It can be launched if necessary by right-clicking on this service and then clicking on "Start Services":

Flow filtering
When internal servers must only be accessible from the gateway, it is necessary to configure their internal firewall.
To do this, simply access the Windows firewall configuration and list the incoming flows ("Inbound Rules" or "Incoming Traffic Rules"), as shown in the following figure.
Among these is the rule named "Remote Desktop - User Mode (TCP-In)", corresponding to incoming RDP traffic from the Windows system. You can analyse its properties by right-clicking and selecting "Properties":

You must then go to the "Scope" tab to configure filtering of incoming RDP traffic:

In the "Remote IP Address" section, you must specify all IP addresses from which incoming RDP traffic is permitted:
If all of these flows must pass through the gateway, the gateway's IP address must be specified.
If the gateway is installed on the server to which an RDP connection is made, the IP address "127.0.0.1" must be specified.

Starting an RDP connection
The RDP connection from a legitimate machine and user to an internal server via the gateway must be configured.
After launching the "Remote Desktop Connection" application, you must configure the gateway in the "Advanced" tab, then "Settings", as shown in the following figure:

The following window will appear:
Select the "Use these RD Gateway server settings" option
Enter the full name of the previously configured RDP gateway
Tick the "Use my RD Gateway credentials for the remote computer" box
Confirm the configuration by clicking "OK

Then, simply return to the general tab of the application, enter the name or IP address of the internal server to which the client wishes to connect and their username, before clicking on the "Connect" button as shown in the following figure:

A window is displayed to the user so that they can verify the name or IP address of the RDP gateway and enter the password for the user account they entered previously:

Next, either the connection is successful, or the gateway certificate is not recognised by the client machine (usually the case with a self-signed certificate or one signed by an internal certification authority), and this message is returned:

RDP protocol hardening
In the event that it is necessary to expose the RDP protocol on the internet, here are several hardening measures to secure the protocol.
It should be noted that these methods are not sufficient to guarantee the security of the services and should only be used temporarily.
Restrict user access
The first step in hardening is to create an Active Directory user group that will be authorised to connect remotely. You can do this via the Group management console(Group Policy Management Console).
In the console, select Configuration > Windows Settings, Security Settings > Group Restrictions. ;
Right-click on Group Restriction and then click on Add Group;
Click Search > Remote Access > Names, then select Remote Desktop Users.

Select the users who will require this RDP access, then click OK:

Deactivate guest account
The Windows Server 2012 R2 operating system has a guest account by default. It is necessary to disable it to prevent an attacker from attempting to elevate privileges on the server.
To do this, type the command compmgmt.msc in a command prompt to open Computer Management.
Temporarily lock an account in the event of a brute force attack
Attempts to log in to a user account should alert the system to prevent an attacker from launching brute force attacks until they identify a valid password.
To do this,
Type the command
gpedit.mscto open the Local Group Policy EditorClick Computer Configuration > Administrative Templates > Windows Components > Remote Desktop Services > Remote Desktop Session Host > Connections > Limit the number of connections
We recommend locking the account after 5 failed login attempts.
Use a strong password policy
To reduce the risk of a successful brute force or dictionary attack, the first thing to do is to use strong passwords with all types of characters: Upper case letters, lower case letters, numbers and special characters.
To configure this,
Type the command
gpedit.mscin a command prompt to open the Local Group Policy EditorClick Computer Configuration > Windows Settings > Security Settings > Account Policies > Password Policy.
Last updated
Was this helpful?