

Setup CrowdStrike's ITP with Entra ID
Before starting the integration, ensure that:
You have a paid Entra ID license. Note that Microsoft Entra ID Free is not supported.
The account used has global administrator rights to your Entra ID account.
1. Purpose of ITP (Identity Threat Protection)
The ITP option continuously monitors account-related activities and Active Directory to detect abnormal behavior:
Identity-centered behavioral analysis
Suspicious authentications
Unusual access patterns
Unauthorized login attempts
User account anomalies
Examples of detected events: suspicious workstation-to-server connections, network scans, brute-force attempts, or credential extraction. When a critical event is identified, the module can automatically block it.
Assessment of your Active Directory security posture
The module provides a real-time overview of your Active Directory security, similar to the Stoïk Protect AD scan but with more advanced options:
Identification of configuration issues
Detection of accounts with compromised passwords
Management and control of user privileges
This feature helps you quickly remediate vulnerabilities and strengthen the security of your infrastructure.
Cloud threat monitoring (optional)
When configured with your identity service (e.g. Entra ID), ITP can detect threats in your cloud environments:
Logins from suspicious IP addresses
Abnormal access attempts to user accounts
This integration helps protect your identities both on-premise and in the cloud, providing full and proactive visibility into your security posture.
2. Integration of ITP
The integration of Identity Protection with Microsoft Entra ID requires the following steps for each Azure tenant:
Creation and configuration of an application in Entra ID
Retrieval of the tenant domain
Retrieval of the application ID and secret
Creation of a custom role for RBAC access
Configuration of the ITP option
Transmission of the collected information
Configuration of the connector in Identity Protection
Remediation permissions
Step 1: Create and configure an application in Entra ID
In the Azure portal, open the left-hand menu and click “Microsoft Entra ID”
On the Microsoft Entra ID page, from the Add menu, select “App registrations”
On the “Register an application” page:
Under Name, enter a name that matches your internal naming conventions, or use “stoik-connector-itp”
Under Supported account types, select “Accounts in this organizational directory only”
Under Redirect URI, select “Web” and enter
https://localhostClick Register
In the application’s left-hand menu, click “API permissions”
On the API permissions page, click “Add a permission”
In the Request API permissions panel:
Click Microsoft Graph
Select Application permissions
Important – In “Select permissions”:
Type “directory”, expand Directory, and select Directory.Read.All
Type “audit”, expand AuditLog, and select AuditLog.Read.All
Click Add permissions
On the API permissions page, click Grant admin consent and confirm
Step 2: Retrieve the tenant domain
In the Azure portal, go to Microsoft Entra ID
In the left-hand menu, click Overview
Note the value of the Primary domain (e.g.
example.onmicrosoft.com), which will be required later
Step 3: Retrieve the application ID and secret
In Microsoft Entra ID, go to App registrations
Select your application
In Overview, note the Application (client) ID, which will be required later
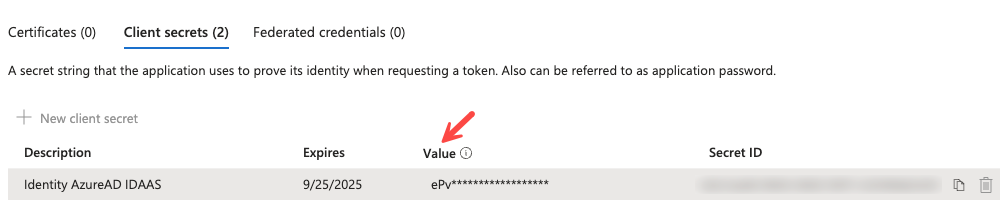
In Certificates & secrets:
Create a new client secret
Provide a description and an expiration duration
Important: immediately save the generated value, as it will not be visible again and will be required later
Step 4: Create a custom role for RBAC access
To display Azure RBAC role assignment information in Identity Protection, the application must be granted permission to read RBAC definitions and assignments. It is recommended to create a custom role with the minimum required permissions.
Create the custom role
In the Azure portal, go to Management Groups
Click Tenant Root Group
Select Access control (IAM), then click Roles
Click Add, then select Add custom role
In the Basics tab:
Enter a clear name for the role (e.g. “Identity Protection RBAC Reader”)
In the Permissions tab, add the following permissions:
Microsoft.Authorization/roleDefinitions/readMicrosoft.Authorization/roleAssignments/read
Click Review + create, review the role settings, then click Create
Assign the custom role
Once the role has been created, assign it to the previously created application:
In the Azure portal, return to Management Groups
Click Tenant Root Group
Select Access control (IAM), then click Role assignments
Click Add, then select Add role assignment
In the Role tab, select the custom role you just created
In the Members tab:
Click Select members
Search for the previously created application (e.g. “stoik-connector-itp”)
Select it and click Select
Click Review + assign
Review the assignment details and click Review + assign again to confirm
Step 5: Transmission of collected information
Note: This step applies if you do not have administrative access to your Falcon ITP platform. Otherwise, please refer to Step 5.B.
Securely send the previously collected information to your Stoïk point of contact to set up the ITP connection:
Tenant primary domain name*
Application ID
Application secret
* Please note that the domain name to provide is the one generated by Microsoft during the creation of your Azure tenant. It is accessible via the link below and always ends with “onmicrosoft.com”.
Step 6: Connector configuration in Identity Protection
In the Falcon console, go to Identity Protection > Configure > Connectors
Select “Entra” under the IDAAS category
Configure the connector with:
Tenant primary domain name
Application ID
Application secret
Enable the login data collection option
Save the configuration

The status indicator should turn green within a minute, confirming that the connection has been successfully established.
* Please note that the domain name to use is the one generated by Microsoft during the creation of your Azure tenant. It is accessible via the link below and always ends with “onmicrosoft.com”.
Step 7: Remediation by Stoïk teams
In the event of an account compromise in your Entra ID environment during nights or weekends, your teams may not be available to perform the necessary remediation actions. We therefore recommend granting access that allows impacted accounts to be disabled in the event of a confirmed compromise.
To do so, simply click on the provided link. You will be redirected to a page similar to the example below. Click Accept after reviewing the requested permissions. You will then be redirected to a blank page, which you may close.
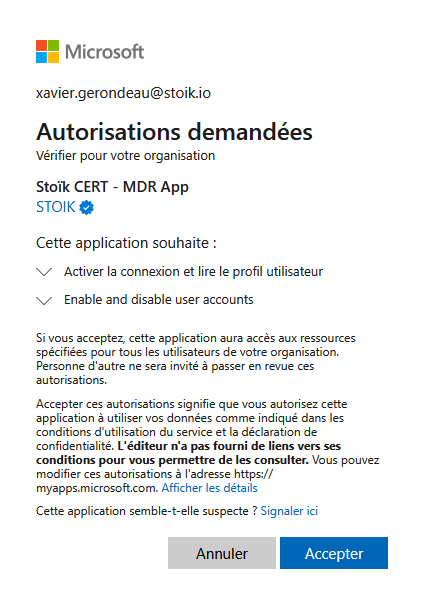
The application only has the permissions required to enable or disable existing accounts in your Azure environment, with no ability to create accounts or modify other attributes.
Access to these features is strictly controlled: each action is authenticated via MFA (multi-factor authentication), logged, and timestamped. A complete audit log of these operations can be provided upon request.
Last updated
Was this helpful?